project07:Performance
| (19 intermediate revisions by one user not shown) | |||
| Line 16: | Line 16: | ||
| − | |||
| − | |||
| − | |||
| − | |||
| − | |||
| − | |||
| − | |||
| − | |||
| + | ==Timelapse & building proces== | ||
| + | The building and corresponding surroundings are floating, built up on site, and erected by hot-wire robots which are already on the RDM site. In this sense the design of the building, its building proces and the RDM are inevitably connected to each other. | ||
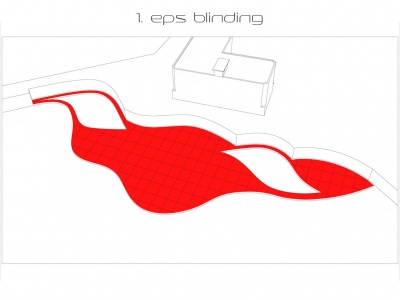
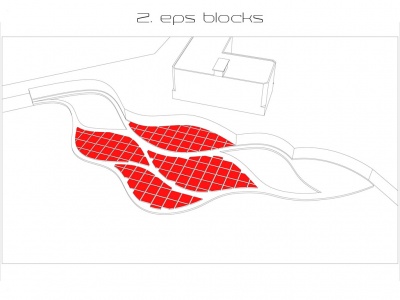
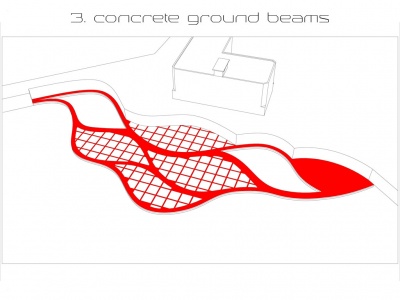
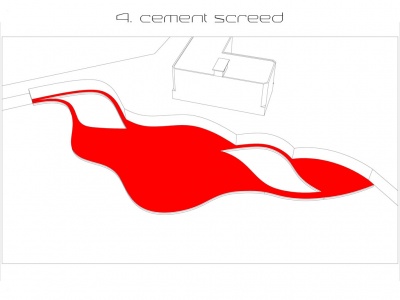
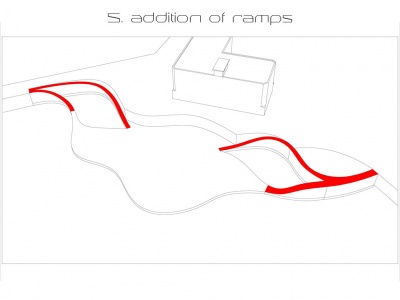
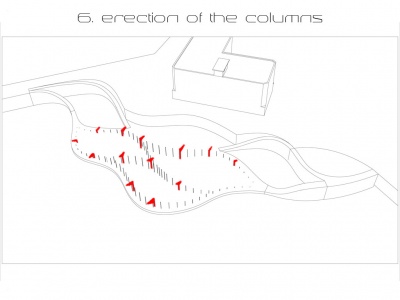
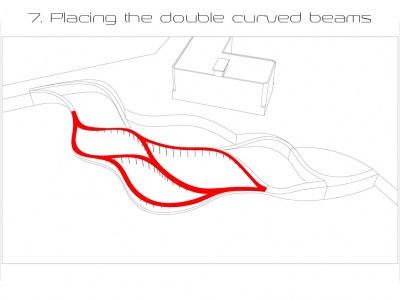
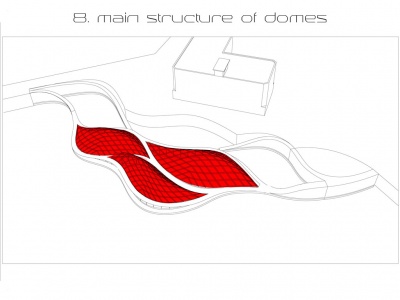
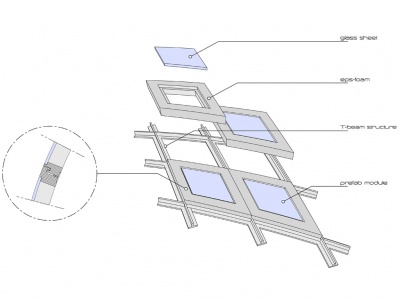
| + | The DOK EXPO 2.0 is composed by a lightweight structure where EPS blocks and concrete strokes are working together to make the buildings structure possible. It starts with a EPS blinding, composed out of blocks which can be hooked to each other. Step two concists of adding another layer of EPS blocks which serves as the formwork for the concrete ground beams. Columns can be placed on these strokes, afterwards the floating structure can be finished with a cement screed. Then on top of the columns a double curved hand made beam can be fixed. When the double curved beams are in place the bearing structure for the three domes can be added. In this bearing frame the masscustomized diamand modules can be added. The diamond modules are also built up from EPS blocks, these blocks are double curved and provides the frame for the double curved glazing. | ||
| − | + | <div style="height:310px; width: 850px; margin:0px; padding: 0px; padding-top: 10px; overflow: hidden;"> | |
| − | + | <div style="float:left; width: 270px; height 152px; margin-left:10px; border:0px;" align="center"> | |
| − | <div style="height: | + | [[File:Constructie0001.jpg|400px|Step 01: EPS blinding]] |
| − | <div style="float:left; width: | + | |
| − | [[File: | + | |
</div> | </div> | ||
| + | <div style="float:right; width: 270px; height 152px; margin-right:150px; border:0px;" align="center"> | ||
| + | [[File:Constructie0002.jpg|400px|Step 02: EPS blocks]] | ||
</div> | </div> | ||
| − | |||
| − | |||
| − | |||
| − | |||
| − | |||
| − | |||
</div> | </div> | ||
| + | <div style="height:310px; width: 850px; margin:0px; padding: 0px; padding-top: 10px; overflow: hidden;"> | ||
| + | <div style="float:left; width: 270px; height 152px; margin-left:10px; border:0px;" align="center"> | ||
| + | [[File:Constructie0003.jpg|400px|Step 03: Concrete ground beams]] | ||
</div> | </div> | ||
| − | + | <div style="float:right; width: 270px; height 152px; margin-right:150px; border:0px;" align="center"> | |
| − | + | [[File:Constructie0004.jpg|400px|Step 04: Cement screed]] | |
| − | + | ||
| − | + | ||
| − | <div style="float: | + | |
| − | [[File: | + | |
</div> | </div> | ||
</div> | </div> | ||
| − | + | <div style="height:310px; width: 850px; margin:0px; padding: 0px; padding-top: 10px; overflow: hidden;"> | |
| − | + | <div style="float:left; width: 270px; height 152px; margin-left:10px; border:0px;" align="center"> | |
| − | + | [[File:Constructie0005.jpg|400px|Step 05: Addition of ramps]] | |
| − | <div style="height: | + | |
| − | <div style="float:left; width: | + | |
| − | [[File: | + | |
</div> | </div> | ||
| + | <div style="float:right; width: 270px; height 152px; margin-right:150px; border:0px;" align="center"> | ||
| + | [[File:Constructie0006.jpg|400px|Step 06: Erection of the columns]] | ||
</div> | </div> | ||
| − | |||
| − | |||
| − | |||
| − | |||
| − | |||
| − | |||
</div> | </div> | ||
| + | <div style="height:310px; width: 850px; margin:0px; padding: 0px; padding-top: 10px; overflow: hidden;"> | ||
| + | <div style="float:left; width: 270px; height 152px; margin-left:10px; border:0px;" align="center"> | ||
| + | [[File:Constructie0007.jpg|400px|Step 07: Placing the double curved beams]] | ||
</div> | </div> | ||
| − | + | <div style="float:right; width: 270px; height 152px; margin-right:150px; border:0px;" align="center"> | |
| − | + | [[File:Constructie0008.jpg|400px|Step 08: Main structure of domes]] | |
| − | + | </div> | |
| − | <div style="height: | + | </div> |
| − | <div style="float:left; width: | + | <div style="height:310px; width: 850px; margin:0px; padding: 0px; padding-top: 10px; overflow: hidden;"> |
| − | [[File: | + | <div style="float:left; width: 270px; height 152px; margin-left:10px; border:0px;" align="center"> |
| + | [[File:Constructie0009.jpg|400px|Step 09: Final cladding]] | ||
</div> | </div> | ||
</div> | </div> | ||
| − | == | + | ==Detailing & technical sections== |
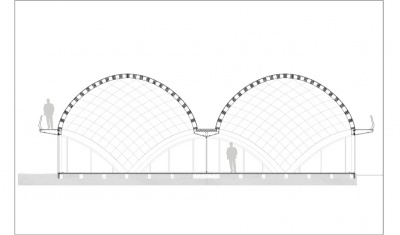
| − | <div style="height: | + | From the inside a continuous image from dome to dome can be perceived. The walking path is perceived as a smooth architecture, where the edges of the path are smooth and continuous. Shadow gaps are created at the border of the domes. This enhances the tight transition between path and dome, clear line/border between path and the base of dome is established. |
| − | <div style="float:left; width: 400px; height 400px; margin-right: | + | |
| − | [[File: | + | <div style="height:310px; width: 850px; margin:0px; padding: 0px; padding-top: 10px; overflow: hidden;"> |
| + | <div style="float:left; width: 270px; height 152px; margin-left:10px; border:0px;" align="center"> | ||
| + | [[File:Detail 1.jpg|400px|Detail, connection facade - path - dome]] | ||
| + | </div> | ||
| + | <div style="float:right; width: 270px; height 152px; margin-right:150px; border:0px;" align="center"> | ||
| + | [[File:Detail 2.jpg|400px|Detail, connection internal wall - path - domes]] | ||
| + | </div> | ||
| + | </div> | ||
| + | <div style="height:310px; width: 850px; margin:0px; padding: 0px; padding-top: 10px; overflow: hidden;"> | ||
| + | <div style="float:left; width: 270px; height 152px; margin-left:10px; border:0px;" align="center"> | ||
| + | [[File:Sections two.jpg|400px|Section, facade - path - dome]] | ||
| + | </div> | ||
| + | <div style="float:right; width: 270px; height 152px; margin-right:150px; border:0px;" align="center"> | ||
| + | [[File:Section total.jpg|400px|Section, internal wall - path - domes]] | ||
</div> | </div> | ||
</div> | </div> | ||
| − | == | + | ==Concept of the dome structure== |
| − | + | <div style="float:left; width: 270px; height 152px; margin-left:10px; border:0px;" align="center"> | |
| − | <div style="float:left; width: | + | [[File:Concept_bt.jpg|400px|Exploded view of the domes structure]] |
| − | [[File: | + | |
| − | + | ||
| − | + | ||
Latest revision as of 15:31, 18 January 2013
Performance
[edit] Timelapse & building proces
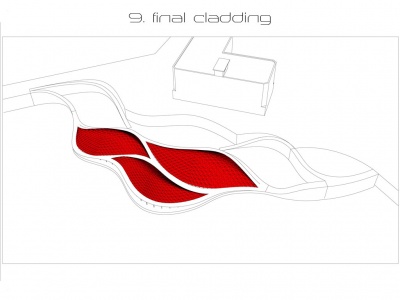
The building and corresponding surroundings are floating, built up on site, and erected by hot-wire robots which are already on the RDM site. In this sense the design of the building, its building proces and the RDM are inevitably connected to each other. The DOK EXPO 2.0 is composed by a lightweight structure where EPS blocks and concrete strokes are working together to make the buildings structure possible. It starts with a EPS blinding, composed out of blocks which can be hooked to each other. Step two concists of adding another layer of EPS blocks which serves as the formwork for the concrete ground beams. Columns can be placed on these strokes, afterwards the floating structure can be finished with a cement screed. Then on top of the columns a double curved hand made beam can be fixed. When the double curved beams are in place the bearing structure for the three domes can be added. In this bearing frame the masscustomized diamand modules can be added. The diamond modules are also built up from EPS blocks, these blocks are double curved and provides the frame for the double curved glazing.
[edit] Detailing & technical sections
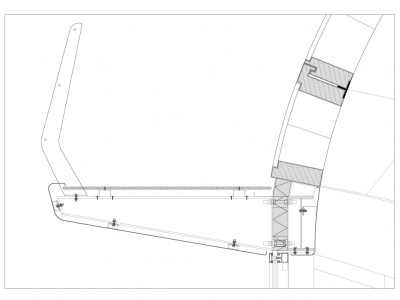
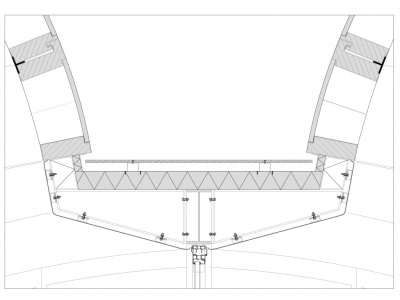
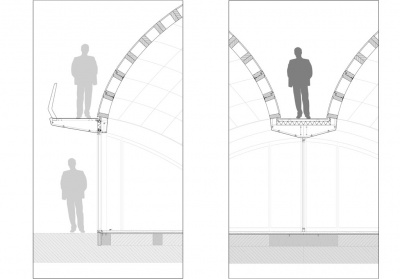
From the inside a continuous image from dome to dome can be perceived. The walking path is perceived as a smooth architecture, where the edges of the path are smooth and continuous. Shadow gaps are created at the border of the domes. This enhances the tight transition between path and dome, clear line/border between path and the base of dome is established.
