project18:Performance
| (25 intermediate revisions by one user not shown) | |||
| Line 1: | Line 1: | ||
| − | |||
'''Section overview''' | '''Section overview''' | ||
---- | ---- | ||
| + | [[File:Project 18 Performance section.jpg|80px]] <-- click for the exact location of the section | ||
[[File:Project 18 Main section v2.jpg|900px]] | [[File:Project 18 Main section v2.jpg|900px]] | ||
| Line 15: | Line 15: | ||
'''A. Cave structure''' | '''A. Cave structure''' | ||
| − | The structure of the cave consists of wooden beams to give a certain shape in the first place. When the beams are set, a layer of corrugated steel sheets comes on top of it, covering the empty spaces between the beams. At this point the beams together with the steel sheets will work as a shuttering. Last step is pouring the concrete to make a strong, stable structure to carry | + | The structure of the cave consists of wooden beams to give a certain shape in the first place. When the beams are set, a layer of corrugated steel sheets comes on top of it, covering the empty spaces between the beams. At this point the beams together with the steel sheets will work as a shuttering. Last step is pouring the concrete to make a strong, stable structure to carry the weight of the projects above, such as EZ RDM, the Cave and Open House. |
[[File:Project 18 Cave structure exploded view.jpg|500px]] | [[File:Project 18 Cave structure exploded view.jpg|500px]] | ||
| − | The wooden beams are 15 to 25 meters long, depending on the shape and positioning. Each beam has 400mm space in between. At first this looks like an overkill of many wooden beams, however these beams don't carry all the weight. | + | The wooden beams are 15 to 25 meters long, depending on the shape and positioning. Each beam has 400mm space in between. At first this looks like an overkill of many wooden beams, however these beams don't carry all the weight. When pouring the concrete, the steel sheets will have supporting structure underneath until the concrete is hard enough to carry its own weight. |
'''B. Energy generating platform''' | '''B. Energy generating platform''' | ||
| − | The platform carries all the weight of the whole island. The system used on this platform supports the sustainable idea of the Learn and Play concept. The weight of the island is carried by many floating air columns. These columns make | + | The platform carries all the weight of the whole island. The system used on this platform supports the sustainable idea of the Learn and Play concept. The weight of the island is carried by many floating air columns. These columns make up and down movements as the waves hits them, therefore generating energy. |
[[File:Project 18 Wave energy.jpg|300px]] [[File:Project 18 Wave energy2.jpg|300px]] | [[File:Project 18 Wave energy.jpg|300px]] [[File:Project 18 Wave energy2.jpg|300px]] | ||
| Line 34: | Line 34: | ||
'''C. Spaces for trees or staircases for the project Open House''' | '''C. Spaces for trees or staircases for the project Open House''' | ||
| − | These spaces created above the "columns" provide an ideal space to plant trees so that the roots have enough space to grow. However | + | These spaces created above the "columns" provide an ideal space to plant trees so that the roots have enough space to grow. However some of these spaces will be used by the project Open House, which is on top of it. In these cases, these spaces will be used as some kind of staircases for that project (more information about this on [[project27:frontpage|Open House]]). |
| Line 52: | Line 52: | ||
'''E. Paving''' | '''E. Paving''' | ||
| + | The structure for the paving consists of three layers. First a concrete slab (which is the concrete from the cave structure) with a layer of sand on top of it. On top of the sand comes the stone tiles. It is also possible to put some mortar underneath the tiles to stick it stronger on the sand. | ||
[[File:Project 18 Paving method.jpg|300px]] | [[File:Project 18 Paving method.jpg|300px]] | ||
| + | |||
| + | Paving method | ||
| + | |||
Since this project is about landscaping and providing accessability and routings to other projects, using piezoelectricity underneath the pavement is a must have. This also supports the concept of Learn and Play. | Since this project is about landscaping and providing accessability and routings to other projects, using piezoelectricity underneath the pavement is a must have. This also supports the concept of Learn and Play. | ||
| + | This system is put between the sand and the tiles. | ||
[[File:Project 18 Pedastrian tiles 1.jpg|300px]] | [[File:Project 18 Pedastrian tiles 1.jpg|300px]] | ||
| Line 74: | Line 79: | ||
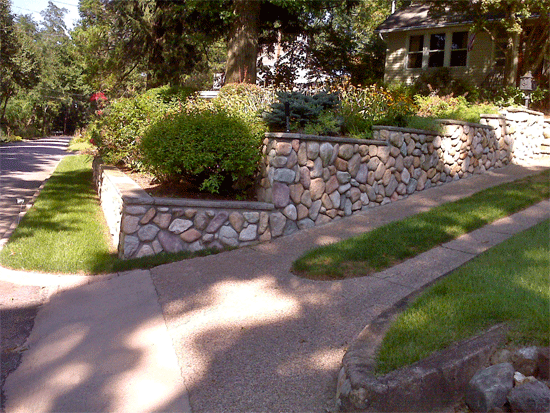
'''F. Stone walls''' | '''F. Stone walls''' | ||
| − | The stone walls | + | The stone walls play a huge part to get the feeling of a natural island. To achieve this look, the walls are decorated with cultured stones. These stones are put on concrete walls with metal lath sheets and mortar as connecting material. |
| − | [[File:Project 18 Stone | + | [[File:Project 18 Cultured-Stone-Wall.jpg|300px]] |
| + | |||
| + | Reference of cultured stone walls. | ||
'''G. Wooden deck''' | '''G. Wooden deck''' | ||
| + | The installation of the wooden deck is a straightforward method that uses wooden beams with wooden planks in the opposite direction with about 5mm in between. Using screws to secure the planks on the beams. | ||
| + | [[File:Project 18 Wooden deck.jpg]] | ||
| Line 89: | Line 98: | ||
| − | 1. | + | 1. Energy generating platform. http://www.physics-edu.org/tech/ocean_wave_power_plants.htm Accessed on 01-12-2012. |
| − | 2. | + | 2. Tree planting. http://www.treesaregood.com/treecare/images/new_tree_plant.rvsd.jpg Accessed on 01-12-2012. |
| − | 3. | + | 3. Green roof detail. http://www.safeguardeurope.com/applications/green_roofs_flat.php Accessed on 01-12-2012. |
4. Pedastrian tiles piezoelectricity. http://www.innowattech.co.il/slnPedestrians.aspx Accessed on 02-12-2012. | 4. Pedastrian tiles piezoelectricity. http://www.innowattech.co.il/slnPedestrians.aspx Accessed on 02-12-2012. | ||
| + | |||
| + | 5. Cultured wall. http://www.dfldesign.com/images/Cultured-Stone-Wall.gif - Accessed on 18-01-2013. | ||
| + | |||
| + | 6. Wooden deck. http://www.livios.be/nl/_build/_surr/_terr/8180.asp - Accessed on 18-01-2013. | ||
Latest revision as of 07:53, 18 January 2013
Section overview
 <-- click for the exact location of the section

1. Main structure

A. Cave structure
The structure of the cave consists of wooden beams to give a certain shape in the first place. When the beams are set, a layer of corrugated steel sheets comes on top of it, covering the empty spaces between the beams. At this point the beams together with the steel sheets will work as a shuttering. Last step is pouring the concrete to make a strong, stable structure to carry the weight of the projects above, such as EZ RDM, the Cave and Open House.

The wooden beams are 15 to 25 meters long, depending on the shape and positioning. Each beam has 400mm space in between. At first this looks like an overkill of many wooden beams, however these beams don't carry all the weight. When pouring the concrete, the steel sheets will have supporting structure underneath until the concrete is hard enough to carry its own weight.
B. Energy generating platform
The platform carries all the weight of the whole island. The system used on this platform supports the sustainable idea of the Learn and Play concept. The weight of the island is carried by many floating air columns. These columns make up and down movements as the waves hits them, therefore generating energy.


C. Spaces for trees or staircases for the project Open House
These spaces created above the "columns" provide an ideal space to plant trees so that the roots have enough space to grow. However some of these spaces will be used by the project Open House, which is on top of it. In these cases, these spaces will be used as some kind of staircases for that project (more information about this on Open House).

2. Paving and park

D. Park structure

E. Paving
The structure for the paving consists of three layers. First a concrete slab (which is the concrete from the cave structure) with a layer of sand on top of it. On top of the sand comes the stone tiles. It is also possible to put some mortar underneath the tiles to stick it stronger on the sand.

Paving method
Since this project is about landscaping and providing accessability and routings to other projects, using piezoelectricity underneath the pavement is a must have. This also supports the concept of Learn and Play.
This system is put between the sand and the tiles.


Pedastrian tiles http://www.innowattech.co.il/slnPedestrians.aspx
3. Wooden deck and stone walls


F. Stone walls
The stone walls play a huge part to get the feeling of a natural island. To achieve this look, the walls are decorated with cultured stones. These stones are put on concrete walls with metal lath sheets and mortar as connecting material.

Reference of cultured stone walls.
G. Wooden deck
The installation of the wooden deck is a straightforward method that uses wooden beams with wooden planks in the opposite direction with about 5mm in between. Using screws to secure the planks on the beams.

Reference
1. Energy generating platform. http://www.physics-edu.org/tech/ocean_wave_power_plants.htm Accessed on 01-12-2012.
2. Tree planting. http://www.treesaregood.com/treecare/images/new_tree_plant.rvsd.jpg Accessed on 01-12-2012.
3. Green roof detail. http://www.safeguardeurope.com/applications/green_roofs_flat.php Accessed on 01-12-2012.
4. Pedastrian tiles piezoelectricity. http://www.innowattech.co.il/slnPedestrians.aspx Accessed on 02-12-2012.
5. Cultured wall. http://www.dfldesign.com/images/Cultured-Stone-Wall.gif - Accessed on 18-01-2013.
6. Wooden deck. http://www.livios.be/nl/_build/_surr/_terr/8180.asp - Accessed on 18-01-2013.